Testing my new TensorFlow / OpenCV / etc. docker image
12 May 2018My last post was all about creating a TensorFlow docker image that would work with OpenCV, inside a Jupyter notebook, creating external windows, accessing the webcam, saving things using the current user from host, etc. All that hard work had a reason: use the newest version of TensorFlow for computer vision. So, let’s try it!
To test the docker image, I decided to try something simple to make my life easier if I get attacked by bugs. Google suggested me the official TensorFlow tutorials on image recognition, and I embraced the idea. I must admit, documentation is not the biggest strengh of TensorFlow. Google has been releasing new versions of TensorFlow super fast (current version is 1.8 and, according to github, since November 9, 2015 it had 58 releases!), therefore there are many ways to do the same thing and the documentation is not always updated to the last method. Also, it’s easy to find many examples in the oficial documentation where they apply functions or methods that currently print messages saying they are deprecated! At first, I wanted to use some code together with Tensorboard for this post, but I gave up because after watching the presentations from the TensorFlow Dev Summit 2018 I got really confused about which one is the latest recommended way to use Tensorboard.
I have no idea since when, but TensorFlow has a special repository with pre-trained models implemented in TensorFlow (actually, the repo has links to the pre-trained models because github doesn’t allow huge files anyway) and, following the tutorial I mentioned earlier, I will use an Inception V3 (2015) for my tests. Therefore, the first step is to clone the repo:
$ git clone https://github.com/tensorflow/models
By the way, the docker image does NOT have git installed. Consequently, you must clone the repo from the host. After cloning it, make sure your working directory is the models/tutorials/image/imagenet.

Although I prepared a notebook based (copied?) from the tutorial’s original Python script, it’s always nicer to test something that has a better chance of working. It’s super easy to execute a Python script from a notebook cell: %run classify_image.py. The results are here:
>> Downloading inception-2015-12-05.tgz 100.0%
Successfully downloaded inception-2015-12-05.tgz 88931400 bytes.
giant panda, panda, panda bear, coon bear, Ailuropoda melanoleuca (score = 0.89107)
indri, indris, Indri indri, Indri brevicaudatus (score = 0.00779)
lesser panda, red panda, panda, bear cat, cat bear, Ailurus fulgens (score = 0.00296)
custard apple (score = 0.00147)
earthstar (score = 0.00117)
As expected, it works! However, after I tried it again, it was faster than the first time ![]() . Jupyter notebook kernel restarted, and I tested this:
. Jupyter notebook kernel restarted, and I tested this:
%%time
with tf.Session() as sess:
    pass
Wall time: 603 ms
Remembering when I used to be a Windows day-by-day user, I decided to shut down the docker container and start again. Bingo!
Wall time: 2min 11s.
Asking Google what the hell it was happening, I found a discussion on Github where someone said it was some kind of pre-compilation (JIT) that would happen only once because I’m probably using a compute capability that is different from what the image had before (yep, I’m using the GPU from my laptop: GeForce 940MX, compute capability 5.0).
My solution was to commit the current container to my docker image. It was as simple as executing the command below (objective_darwin was the funny container’s name running at that moment) on a different terminal:
$ docker commit -m "Fix the slow start of first session on TensorFlow" objective_darwin tensorflow_gpu_py3_ready:latest
It could also be automated by inserting the line below into the dockerfile used to create the docker image:
RUN python3 -c 'import tensorflow as tf; s=tf.Session()'
But it will not work because the gpu is not available by default! Before you build it using:
docker build -t tensorflow_gpu_py3_ready -f New_Dockerfile .
You must first stop the docker daemon:
sudo service docker stop
And relaunch it using a special option to enable the gpu:
sudo dockerd --default-runtime=nvidia
After that, you can kill the command above and start the service again:
sudo service docker start
The original TensorFlow Inception V3 model was created for reading directly from a file using a DecodeJpeg op (one can also see it as a fancy node in your dataflow graph). By using special nodes like that, TensorFlow can load stuff in an optimal way from disk speeding up things when you need to train your beast. The original script was:
softmax_tensor = sess.graph.get_tensor_by_name('softmax:0')
predictions = sess.run(softmax_tensor,
                        {'DecodeJpeg/contents:0': image_data})
Here, instead of Tensorboard, I verified the node names by just printing the information about the Inception V3 nodes using a for loop:
for node in graph_def.node:
    print(node.name, node.op, node.input)
The result from the for loop is too long (it’s available in the last cell of the notebook at the end of this post anyway), so I will only show the first lines:
DecodeJpeg/contents Const []
DecodeJpeg DecodeJpeg ['DecodeJpeg/contents']
Cast Cast ['DecodeJpeg']
ExpandDims/dim Const []
ExpandDims ExpandDims ['Cast', 'ExpandDims/dim']
ResizeBilinear/size Const []
ResizeBilinear ResizeBilinear ['ExpandDims', 'ResizeBilinear/size']
Sub/y Const []
Sub Sub ['ResizeBilinear', 'Sub/y']
Mul/y Const []
Mul Mul ['Sub', 'Mul/y']
conv/conv2d_params Const []
conv/Conv2D Conv2D ['Mul', 'conv/conv2d_params']
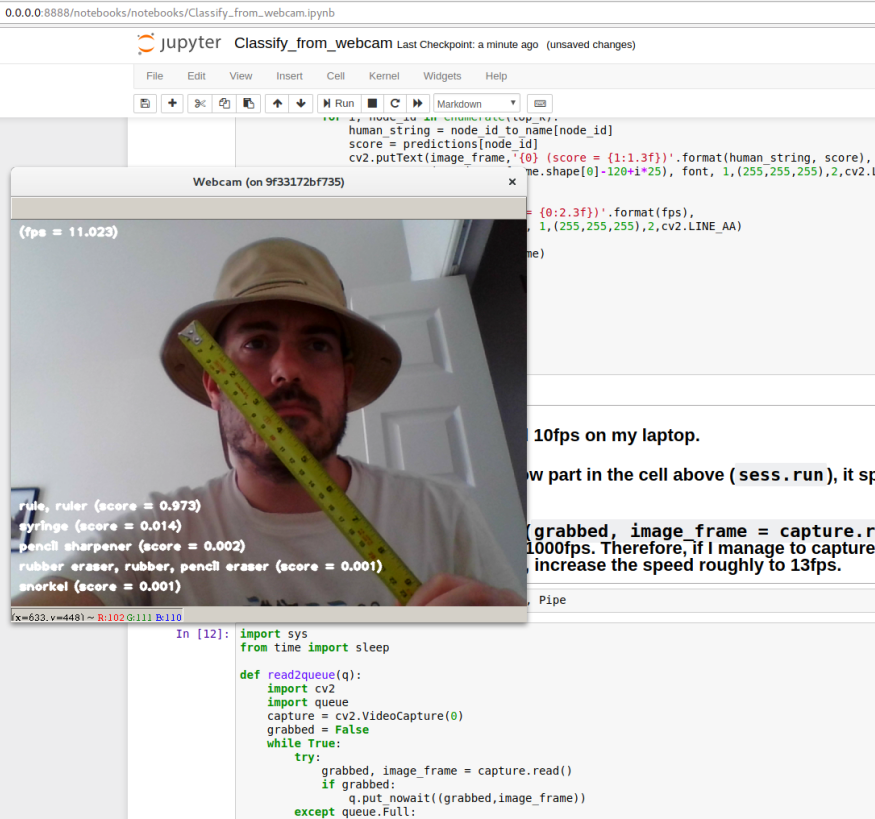
According to the results and after some extra inspections, I realised I could pass the image captured from my webcam directly to Cast:
predictions = sess.run(softmax_tensor,{'Cast:0': image_frame})
After that, it was just a matter of embellishment. Yet, I was not super happy with the results because the system was running at around 10 frames per second (fps). I did some tests and I thought I could improve it by having the image capturing part of the code running in parallel. I tried using Queue and Pipe. Below is the process I defined to run in parallel using Queue. It captures the exception Full so as soon as the queue (I set it for only 2 positions) has a slot it puts a new frame there.
from multiprocessing import Process, Queue

def read2queue(q):
    import cv2
    import queue
    capture = cv2.VideoCapture(0)
    grabbed = False
    while True:
        try:
            grabbed, image_frame = capture.read()
            if grabbed:
                q.put_nowait((grabbed,image_frame))
        except queue.Full:
            continue

frame_queue = Queue(2)
frame_proc = Process(target=read2queue, args=(frame_queue,))
frame_proc.daemon = True # to make sure it will die if its parent dies.

frame_proc.start()
The version using Pipe is simpler than the one above.
from multiprocessing import Process, Pipe, connection

def read2pipe(pout, pin):
    from multiprocessing import Process, Pipe, connection
    import cv2
    capture = cv2.VideoCapture(0)
    grabbed = False
    while True:
        grabbed, image_frame = capture.read()
        if grabbed and not pout.poll():
            pin.send((grabbed,image_frame))
Finally, both parallel versions were actually a wee slower than the serial one.
And, as promised, here is the full notebook ![]() .
.
Cheers!
UPDATE (17/05/2018): The line I suggested adding to the dockerfile was not working because, by default, the docker daemon doesn’t use the nvidia runtime, therefore no gpu was available to run TensorFlow. The weird thing, still in need of an explanation, is why the command RUN ["python3", "-c", "'import tensorflow as tf; s=tf.Session()'"] was not raising an error and I could only see the gpu error when I changed it.
UPDATE (18/05/2018): The reason I found is that RUN ["python3", "-c", "'import tensorflow as tf; s=tf.Session()'"] uses exec and it seems to hide some errors that are internal to the program executed. E.g: ls -0 shows ls: invalid option -- '0', but exec ls -0 hides it from the user.
UPDATE (31/01/2019): New post with an UPDATED image is available!